


Summertime Odyssey can be tiring given its prolonged nature but pragmatically going about it can save both time and efforts. . There is one Echoing Conch and 15 chests in there for a limited time to grabbing it quicky is a must.
This guide will explain how to solve the astral puzzles, seize destiny, and complete “The Ancient Azure Stars” domain.
THE ANCIENT AZURE STARS STORY DOMAIN WALKTHROUGH
Once you bounce into the pool, you’ll wind up in the focal office of Mona’s domain. Get the two checked Asterism Shards on the ground and spot them in the left component so they match the image on the door.
Next, you’ll need to “solve the astral puzzle,” however hitting and holding back nothing on the floor to match the example on the roof. You can tackle the riddle by setting up the Star Guides like this:
Collect the Asterism Shard from the chest and follow the star-formed Seelie out of the room and into the pool. Follow the star through the labyrinth as Mona and complete the projectile damnation star-evading fragment for a cutscene to play.
Back in the Golden Apple Archipelago, go to the obvious area, rout the Hilichurl, and cooperate with the spot it was digging to get another Asterism Shard. Place your two new shards into the instrument on the option to open the door.
In the following room with Star Guides, collaborate with the star on the support point towards the left to raise one more star Seelie to show you where the solution to the riddle is. On the off chance that you’re struggling with seeing it, simply organize the Star Guides like this to “solve the astral riddle” again:
Pick up the fifth Asterism Shard and make a beeline for the focal chamber and hop in the pool.
Head through the “mirror maze” by involving the stars above as an aide. Simply continue to run Mona in straight bearings until she reaches a stopping point until you travel north to rejoin with the star Seelie again.
Back in the Golden Apple Archipelago, again follow the journey route, rout the Hilichurl and look at the spot it was diving in for another Asterism Shard. Return into Mona’s space and explore one more Asterism Shard by the left system. (You will require this later for investigation!) Place the two comparing shards into the north system and head through the entryway for another Star Guide puzzle.
The answer for the riddle is through an entryway on the right, yet to take some real time to consider it, just set up the Star Guides like this:
Again, snatch the Asterism Shard from the chest and make a beeline for the focal chamber. As opposed to hopping in the pool, eliminate the base shard from the component that focuses upper east and utilize that as the top part for the fourth chamber.
Head in and enact the component in the center to show a pineapple-like shape. Make the shape with the Star Guides like how we did below:
Open the chest, get the Asterism Shard, and follow the star Seelie. In the wake of following the way, a cutscene will play, and in the end you’ll play as Mona again.
To “follow the star to the objective” simply continue to run down the lobbies. Comparatively to when Mona really had a star to continue in the start of the space, the walls will continue all alone to uncover a way as you approach them. In the end, you’ll circle around and track down a star. Follow it to get to the last part of the domain.
To “follow the star to the destination ” as Mona, you’ll have to get the moving star that is drifting around the others. When you do, a delineated cutscene will play and the story piece of the area will end.
After getting done, you can connect with the stage to head once again into Mona’s area, where more rooms will open, permitting you to get more money boxes and an Echoing Conch.
THE ANCIENT AZURE STARS DOMAIN CHESTS AND CONCH LOCATIONS
There’s a lot in here, so we’ll break it up by which gate you have to enter.
NORTH TEMPLE ENTRANCE
The entryway that had the heavenly body drifting in the water is currently open, so head through there.
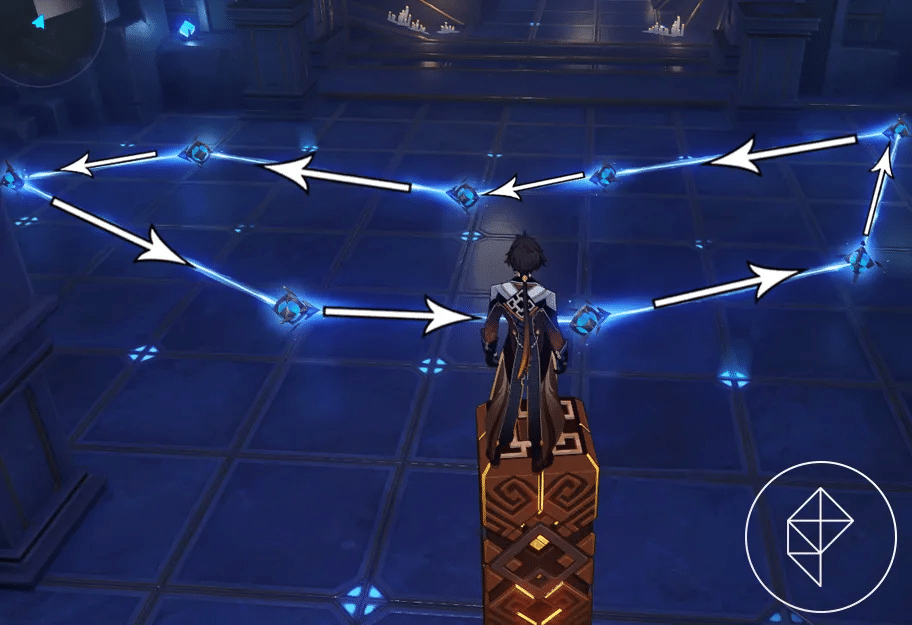
Following the way, there’s one more Star Guide puzzle. Hit this stone in the back to uncover the full heavenly body on the wall.
Star Guides:
Grab the chest and head straight towards the back wall, which will uncover a covered up passage.
The room with the Exquisite Chest has one more downpour rock in it (like the one you hit in the past space to uncover the full heavenly body). Break it to show the genuine area of the Exquisite Chest in the center.
Head up the steps towards the back to uncover one more covered up passage.
In here, there’s a basic support point puzzle. While they all seem to be Hydro points of support, checking the reflections on the ground will uncover that three of them are really Anemo and Pyro points of support. Utilize the Door of Resurrection to trade out your party individuals assuming you really want to, hit the support points with their comparing components, and snatch the chest.
There’s one more secret entryway toward the rear of this room, so head through it. Break the stone on the passed on side and light these lights to get a Common Chest.
If the lights on the right side are lit, utilize a Hydro character to put them out. Run back to the primary room with the pool of water, and you’ll see the water is depleted. Snatch the Common Chest at the bottom.
SOUTH TEMPLE ENTRANCE
Head through the entry to the area and go up the steps on the sides and into the now-open entryway toward the back. Continue to follow the way until you get to a Star Guide puzzle, which will change as you settle it.
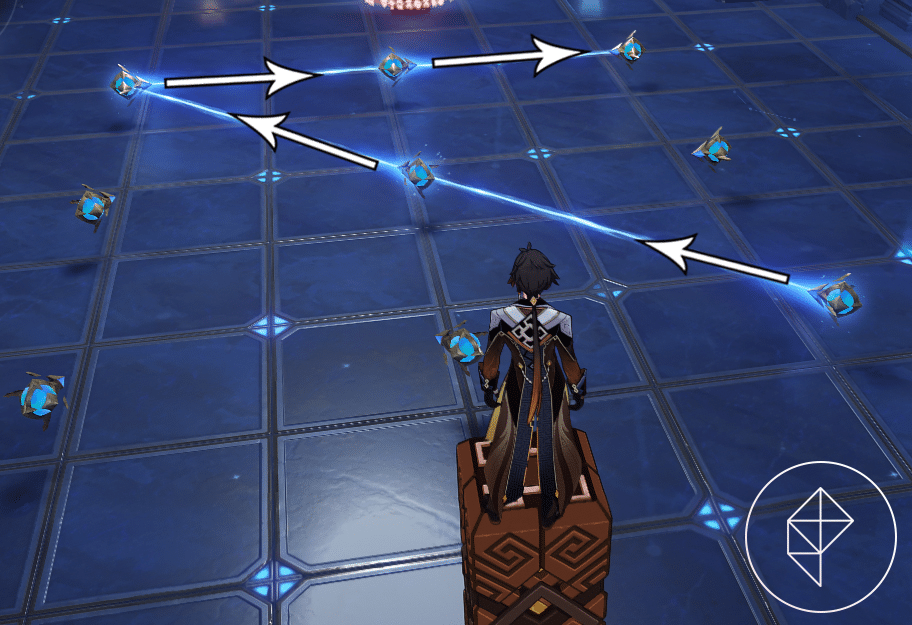
Set the Star Guides like so:
:no_upscale()/cdn.vox-cdn.com/uploads/chorus_asset/file/23887188/jlee_220619_1001_mona_2_2.jpg)
:no_upscale()/cdn.vox-cdn.com/uploads/chorus_asset/file/23887189/jlee_220619_1001_mona_2_3.jpg)
:no_upscale()/cdn.vox-cdn.com/uploads/chorus_asset/file/23887191/jlee_220619_1001_mona_2_4.jpg)
An bolt will currently show up, yet it’s not for the Star Guides. All things considered, that bolt is prompting a mysterious entryway concealed at the wall it’s pointing towards. Head up the way and you’ll see the last Echoing Conch in the room on the left.
The puzzle in this room requires you to shift the stars around so the constellation in the sky matches the one on the floor. To do this hit the right button twice, the up button three times, the down button once, and the left button twice.
Once you do this, snatch the opened chest and follow the star Seelie that shows up from the heavenly body overhead. Follow it down the gap and complete the “Challenge of the Starry Sky.” Head through the entryway once you complete it and get the recently brought forth Luxurious Chest from the focal chamber.
SOUTHWEST TEMPLE ENTRANCE
After going into the fundamental room here, head up the tremendous winding flight of stairs to enter a recently opened region. A star Seelie will lead you up, figured you can’t follow it. You should make a way for yourself utilizing the Star Guides. Set them like so:
Head up the brilliant way you made, contact the star, and open the chest. Take the recently made lift up and get the Common Chest sitting on the edge. Swim back to the lift and take it up again to snatch another Common Chest. Take the lift back as far as possible down.
Head back to the room with the twisting flight of stairs and utilize the component at the base to make another lift show up. Take it up to get a third Common Chest.
NORTHEAST TEMPLE ENTRANCE
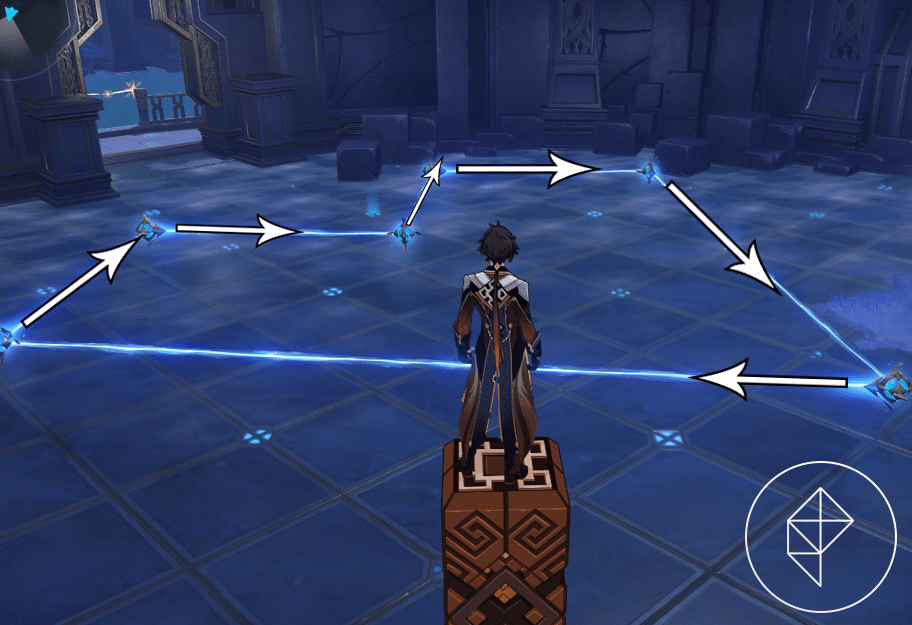
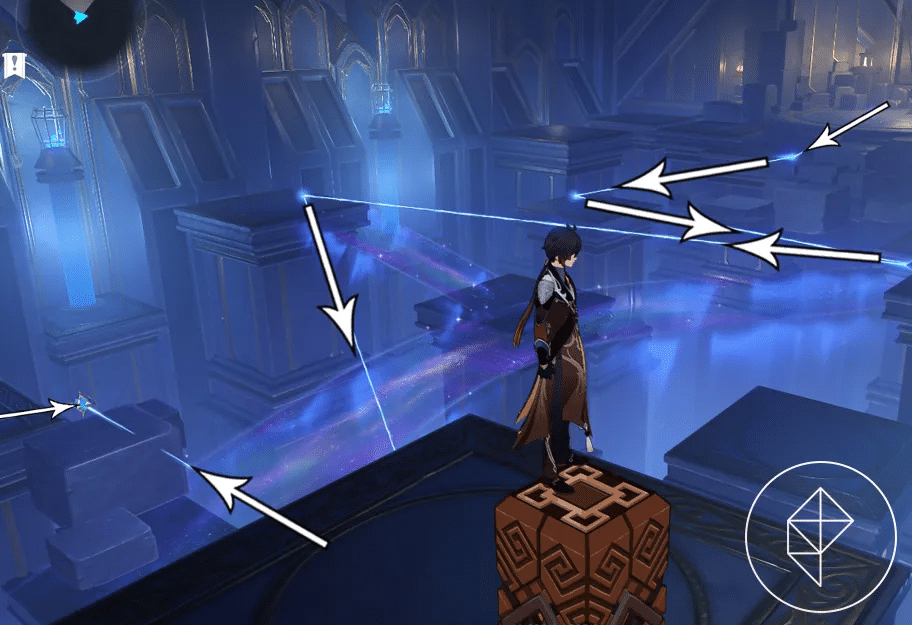
Head through this entry and proceed to the rear of the room, where there’s another way to take. This will place you in a room with more Star Guides, as well as solid shape components. Initiating the systems will make the Star Guide heavenly body show up on a wall, however to manage all that, just set up the aides like this:
Grab the chest and move ahead. At the following room, which has a brilliant scaffold, go left of the underlying stage and connect with the star on the ledge.
Walk across the brilliant way and hop down on the edge to gather another star.
After snatching it, simply stroll across the apparently nothingness to return to the beginning. Just sit back and relax; you can’t fall. Make a beeline for the rear of the space to contact the last star, close to the Asterism Shard component. Put the additional Asterism Shard you found while doing Mona’s story area into the system. Organize the Star Guides like this:
CENTRAL TEMPLE ENTRANCE
Head down the means into the fanciful Mondstadt and contact the globe. There’s one more riddle with the four buttons, so hit the buttons in a specific order: down, right, up, left. An entryway will show up after effectively making the stars seem to be this:
Enter the door and you’ll be back in the central room with another Luxurious Chest.
That’s it for Mona’s domain. You can interact with her event portal to make sure you’re not missing any chests.
